Contributing
Field reports and ideas large and small for how to improve fitgrid
are welcome. Please post what you have in mind on GitHub in
fitgrid Issues in
accord with the Code of Conduct
to start a discussion of next steps and plan the approach. If you
think you have encountered a bug, please follow the bug report
guidlines when
Overview
The fitgrid code is written in Python, and requires many
open-source scientific computing packages including numpy, pandas, matplotlib, and statsmodels. The linear mixed-effects modeling further
requires the pymer4 and rpy2 Python packages as well as the R language, and many R
packages including lme4, and
lmerTest. Version
control is managed with git and the
primary source repository is hosted on GitHub in
https://github.com/kutaslab.
The stable and pre-release fitgrid packages are available on https://anaconda.org/kutaslab/fitgrid for easy installation into conda virtual environments with conda or mamba. The Python package installer pip is not supported because of the R dependencies.
The documentation is generated with sphinx and sphinx-gallery.
- Versions
fitgridis semantically versioned following a simplified Python PEP 440 scheme.Syntax. Legal
fitgridversion strings have three required numeric segments,M.N.Pfor major, minor, patch versions and an optional.devXsuffix with numericX. As usual, the numeric values increment monotonically except that subordinate segments reset to 0 when a superordinate segment increments. Version strings match the regular expression,\d+\.\d+\.\d+(\.dev\d+){0,1}.Semantics.
M.N.Pdesignates a stable version andM.N.P.devXdesignates a development version.
Note
In this scheme, the stable package version
M.N.Psorts higher than the development versionM.N.P.devX, for example,0.5.1>0.5.1.dev1>0.5.1.dev0>0.5.0- GitHub reserved branches and version strings: https://github.com/kutsalab/fitgrid
The main and dev branches are reserved for deploying package releases, only maintainers make pull requests to these branches.
The branch main = the latest stable release, version
M.N.Pwith tagvM.N.PThe branch dev = the latest development version
M.N.P.devX.Names and version strings for working branches other than main and dev are not strictly defined in this scheme. However, the natural version sequence increments the
devXsegment toM.N.P.devX+1following the pre-release package upload ofM.N.P.devXand increments the patch and resets thedevXsegment toM.N.P+1.dev0following the stable release ofvM.N.P.
- Stable releases:
vM.N.P Stable versions are tagged
vM.N.Pand released manually on GitHub (fitgridReleases). The stable versionvM.N.Psource code is frozen and subsequent modifications require the version to increment at least the patch segment. Development versionsM.N.P.devXare not released on GitHub but they are deployed as conda packages (see next).- Conda packages and channels: stable
M.N.Pand pre-releaseM.N.P.devX Conda packages are deployed for stable releases (
vM.N.Pon branch main) and for development versions (M.N.P.devXon branch dev). The stable release deploys to conda channel kutaslab/label/main and is the default forfitgridconda installation. The development package deploys to channel kutaslab/label/pre-release so the latest features and bug-fixes can be installed in conda environments with conda package dependency resolution.- Sphinx and sphinx-gallery documentation
Documentation for the latest stable conda package
vM.N.Pis deployed to gh-pages and available online at https://kutaslab.github.io/fitgrid. Documentation for the latest development versionM.N.P.devXis deployed to gh-pages-dev and available online at https://kutaslab.github.io/fitgrid-dev-docs.- Continuous Integration and Deployment (CID)
The
fitgridCID is implemented in a single-pass GitHub Action workflow, figrid-cid.yml. The continuous integration workflow is triggered by push, pull request and manual release events on GitHub. The deploy phase selectively uploads the conda packages and documentation for development version pre-releases and stable releases. This scheme allows conda or mamba installation of both stable and development versions and automatically synchronizes the stable release version string and source code across the GitHub repository at github.com/kutaslab/fitgrid, the conda packages at anaconda.org/kutaslab/fitgrid , the online sphinx documentation, and the Zenodo source code archive at DOI 10.5281/zenodo.3581496.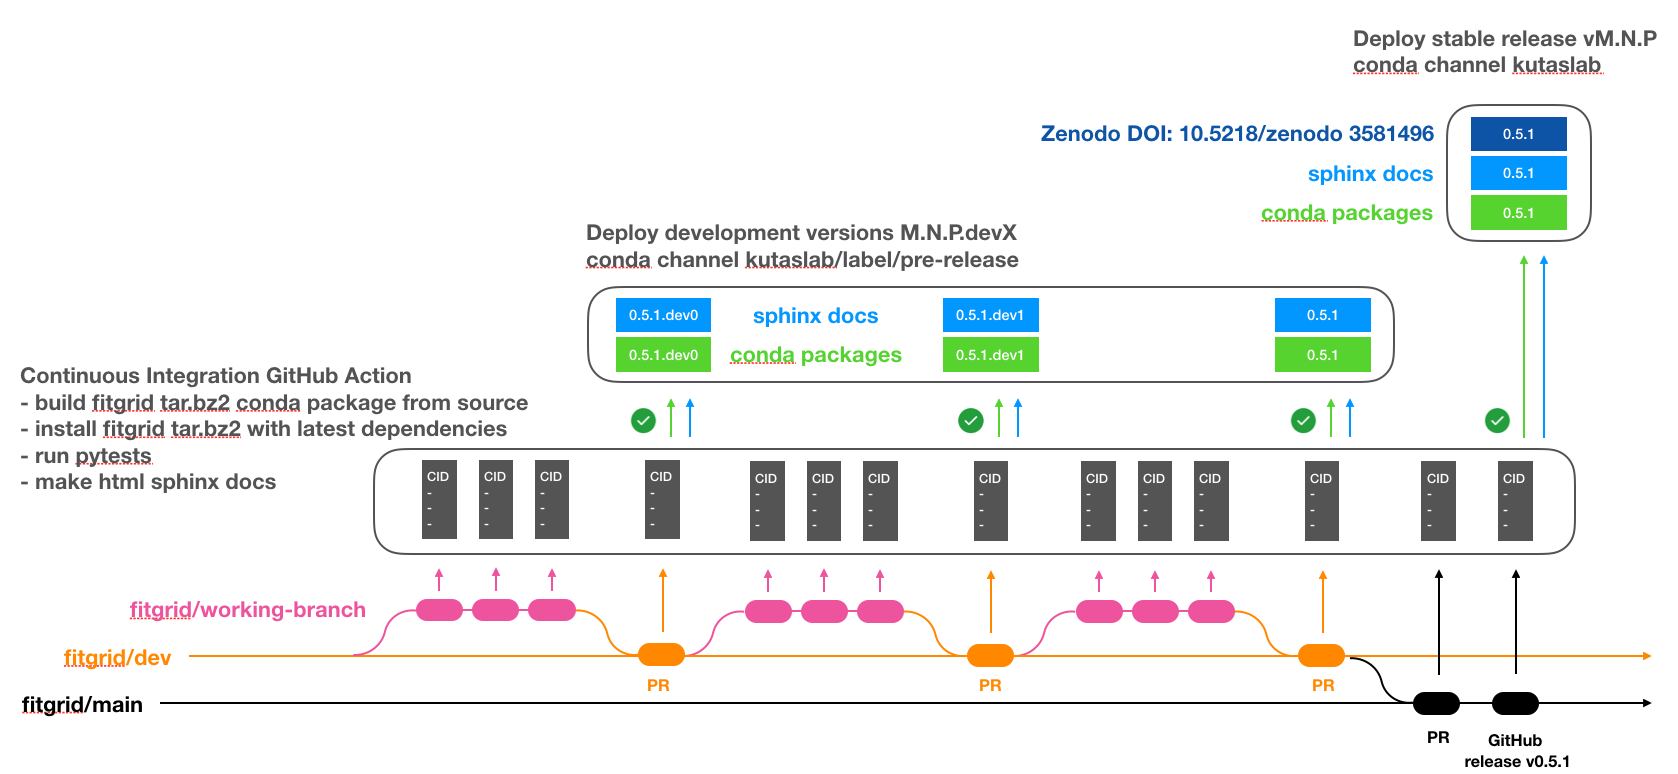
Continuous Integration and Deployment Scheme
Continuous Integration. The conda package is built from the source on the triggering branch and installed into a newly created conda test environment. The pytests in fitgrid/tests/test_*.py are run and the Sphinx html documentation is generated, including the sphinx-gallery *.py examples, in the test environment with the just-built package as installed.
Deployment. If the CI passes, workflows triggered on branch dev with version string of the form
M.N.P.devXor triggered by a GitHub manual releases taggedvM.N.Pon branch main auto-upload the just-built conda package and Sphinx documentation to the appropriate destination repositories.Pre-release:
M.N.P.devXConda packages: –channel kutaslab/label/pre-release
Sphinx documentation: kutaslab.github.io/fitgrid-dev-docs
Stable release:
vM.N.PConda packages: –channel kutaslab
Sphinx documentation: kutaslab.github.io/fitgrid
Zenodo archive DOI: 10.5281/zenodo.3581496
- Developing new features, bug fixes, and docs
Updates to
fitgridsource and docs are committed to working branches typically derived from the kutaslab/fitgrid/dev branch and not directly to the main or dev branches which are reserved for deploying conda packages and documentation. As development on the working branches progesses (magenta in the Continuous Integration and Deployment Scheme), maintainers periodically pull the changes to the dev branch in order to deploy a pre-release package for installation into conda environments. When development is ready for a stable release, maintainers pull dev to the main branch and manually issue a stable release on GitHub taggedvM.N.P. The tagged release uploads theM.N.Pconda packages and sphinx documentation and archives theM.N.Psource on Zenodo.
Development workflow
It is generally advisable to develop, test, and document new work
on a local computer in an active conda environment populated with the
latest compatible fitgrid dependencies along with pytest, the black code formatter,
and sphinx documentation generation packages because that’s what the
continuous integration workflow does.
The following illustrates the steps for a hypothetical working branch
called new-feature in the github.com/kutaslab/fitgrid GitHub repo. It assumes the
git, conda, and mamba executables are already installed on
the local computer and the commands are executed in a bash(-like)
shell.
Git setup
Sign in to GitHub and create a fork of github.com/kutaslab/fitgrid in your GitHub account.
On the local computer where you plan to work,
git clonethe fork.$ git clone https://github.com/<your_github_username>/fitgrid
By default, the local repo created this way will include the main branch only. Alternatively, the repo can be cloned with a specific working branch such as new-feature like so:
$ git clone https://github.com/<your_github_username>/fitgrid \
  --single-branch --branch new-feature
Development environment setup
Create a new named conda development environment for working on the feature, fix, or docs by installing the latest
fitgridpre-release conda package, document generation, and development tools:$ mamba create --name fg-new-feature \ -c conda-forge -c ejolly -c kutaslab/label/pre-release \ fitgrid $ mamba install --name fg-new-feature \ black pytest sphinx sphinx-gallery sphinx_rtd_theme
Navigate to the top-level directory of your local fitgrid git repository, activate the new development environment, and install
fitgridfrom the local source in editable (a.k.a “develop”) mode:$ cd ~/path/to/fitgrid $ conda activate fg-new-feature (fg-new-feature) $ pip install --no-deps -e .
Why? Because installing the pre-release fitgrid conda package
automatically populates the just-created environment with the latest
compatible versions of the hundreds of Python, R, and matrix math
dependencies that the latest version of fitgrid needs to run. Then
pip replaces the just-downloaded-and-installed fitgrid conda
package located in your
~/path/to/conda/envs/fg-new-feature/path/to/site-packages/fitgrid
with a link to your ~/path/to/fitgrid local git repo. This way, the
files you modify are loaded when fitgrid modules are imported by
the pytests and sphinx document generators and your changes are
version-controlled by git.
Note
Experience indicates this is the only time pip install
should be used while developing fitgrid on pain of corrupting
the conda environment. If you want to add other packages to the
development environment use mamba install or conda install.
Develop, test, document
Activate the fg-new-feature development environment.
$ conda activate fg-new-feature
(fg-new-feature) $
Checkout the git working branch. If it doesn’t exist locally,
gitshould automagically set it to track the remote working branch in your GitHub fork, make sure it does.$ git checkout new-feature
Ensure the commit history of the new-feature branch in your GitHub fork and local repo are both up to date with the branch in the upstream GitHub repo github.com/kutaslab/fitgrid where you will make the pull request (PR), i.e., new-feature in this example. This helps reduce risk of merge conflicts later when changes are pulled back into the upstream repository.
Make the changes to the source code .py or docs .rst.
Document the .py source files with numpy-style docstrings.
For new functionality add or update pytests in fitgrid/tests/test_*.py to cover the changes.
If it is useful, add or update a working .py example in the relevant fitgrid/docs/gallery subdirectories for display in the Examples Gallery.
Run a code checker such as flake8 or pylint on the .py files.
Navigate to the top level of the
fitgridrepository, run the code formatter and pytests the same way the GitHub Action CI does:(fg-new-feature) $ black -S --line-length 79 . (fg-new-feature) $ pytest
When pytests pass, navigate to the top level of the
fitgridrepository and build the sphinx documentation the same way the GitHub Action CI does:(fg-new-feature) $ make -C docs clean; make -C docs html
Monitor the docs building for errors and warnings, then open the local file ~/path/to/fitgrid/docs/build/html/index.html in your web browser and visually verify that the .rst docs and sphinx-gallery
*.pyPython examples in the subdirectories of ~/path/to/fitgrid/docs/source/gallery produce the expected results and figures.
Pull requests (PRs)
When pytests pass and documentation builds locally, commit the changes on branch new-feature and push the working branch to your forked
fitgridrepository on GitHub.Sign in to GitHub, navigate to your fork’s Action tab and verify that the push on branch new-feature triggered an Action workflow that runs without error.
If the workflow fails, inspect the Action log, diagnose the problem, go back to Develop, test, document, fix the problem in the local repo, commit the changes, and push them to the forked repository.
When the CI workflow for branch new-feature passes in the forked repository, make a pull request back to the upstream working branch.
Tips
Run
conda list fitgridto confirm it is installed in editable mode in the active development environment. It should look something like this:(fg-new-feature) userid@machine$ conda list fitgrid # packages in environment at /home/userid/miniconda3/envs/fg-new-feature: # # Name Version Build Channel fitgrid 0.5.1.dev5 dev_0 <develop>
Check that Version matches the version string in fitgrid/__init__.py in your local source git repo and the conda Channel is <develop>.
If you plan to use Jupyter or JupyterLab to develop code or documentation examples things may go more smoothly if you
mamba installorconda installthe package into the development enviroment where you are working onfitgrid.If working in a Jupyter notebook, you can use
importlib.reload()to load modified source code between kernel restarts.You can rebuild the .rst documentation quickly without running the sphinx-gallery Python examples by running this command in the top-level repository directory:
make -C docs html-noexec